Christmas Recipes
With Christmas on our doorsteps, I looked up some useful tutorials.
enjoy~!
from a great site!!->(http://www.allfreecrafts.com/christmas/)
Paperback Tree

Supplies:
paperback book
wooden star
gold, silver or green spray paint
utility knife or sharp paring knife
Project Instructions:
Choose a paperback book with a strong spine and remove the covers.
Slice the spine with a sharp knife to separate the first 30 pages. This will make the first half of the tree.
Begin folding the pages at right. First, fold the top right corner toward the spine to form a right angled triangle.
Fold the triangle toward the spine again.
The bottom edge of the page will overhang the bottom of the book.
Fold the overhanging triangle at the bottom of the book back up to form a straight line along the the bottom of page.
Repeat with all thirty pages and set aside.
Use the knife to slice another 30 pages from the book. Turn this section so the spine is on the right, rather than left. Repeat the steps above to create a mirror image.
Glue the two halves of the Christmas tree together and add a wooden star at the top.
Spray paint the tree all over. You may need two or three coats for complete coverage.
Birch Reindeer
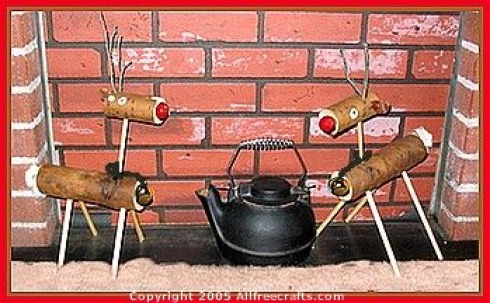
Supplies: birch, maple or other tree branches, cut to the size that you want your reindeer models to be
twigs for antlers
4 pieces of dowel, or straight sticks for the legs
small amounts of black and white craft paint, or google eyes
red bead or marble
small gold jingle bell and small scrap of yarn to hang it
cotton ball for tail
hand saw
drill or awl
craft glue
Instructions:
You will need to use the hand saw to cut two pieces from birch branches, one for the body of the reindeer, and one smaller branch for the head.
Cut four pieces of dowel to an equal length to use as legs. Use the drill or awl to bore a small hole, angled into the birch branch at the entry point of each of the four legs. You will want the front legs to be directly opposite each other and the same for the back legs. Insert the dowels for a test fit and adjust the length of the legs if required. Once you are satisfied in the position of the legs, take out the dowel, apply a small amount of craft glue to one end and insert it back into the drilled leg hole again. Let dry.
Use a similar process to attach a dowel to the head as a neck, then to attach the dowel neck to the body. Look at the photo to give you an idea of the neck position. Do the same to insert and glue on small twigs or sticks as antlers.
Paint two eyes on either side of the head, or glue on google eyes.
Glue a red bead or marble to the nose area.
Glue on a white cotton ball as the tail.
Finally, thread a gold jingle bell with colored yarn and hang it from the neck, over the front of the body area. If the bell won't stay put, use a little glue to position it securely.
Optional: If desired, you could make small ears from a scrap of leather, craft foam or felt and glue these on near the antlers.
Egg Carton Candy Wagon

Recycled Egg Carton Candy Wagon for Christmas
designed by Twila Lenoir
Copyright © 2004-2007 Allfreecrafts.com All Rights Reserved
Here's a great way to recycle a styrofoam egg carton, and make a cheerful Christmas candy wagon decoration as well. All you need is the egg carton, some styrofoam balls, glue, a bit of ribbon and some Christmas greenery. Oops, almost forgot ... you'll need some nuts and candy too!
Supplies:
Egg carton, preferably styrofoam
2 two-inch Styrofoam balls
4 ribbon roses
1 ½ yards flat ribbon edged with lace
glue
three picks of Christmas greenery
Instructions:
1. Cut off the egg carton lid. Wash the bottom part of the egg cartoon with hot water and soap and dry thoroughly.
2. Starting in the middle of one long side, glue the ribbon all the way around the egg carton, close to the top rim, overlapping the edges of the ribbon where they meet.
3. Cut each of the two styrofoam balls in half. Now you have four half balls. Take each one of these segments and slice a small part off the rounded end. Glue these circular segments to the ribbon on the egg carton, to represent four wheels. Make sure the "tires" are upright and securely fastened with glue so they don't snap off with the weight of the candy.
4. Glue a ribbon rose in the center of each wheel.
5. Pull apart the picks of Christmas greenery - this may be artifical holly leaves, cedar boughs or something similar. Begin gluing small sections of greenery to the wagon, overlapping a little as you work your way around the outside. Allow the greenery to overlap the rim of the wagon just a little. When you are finished the outside, glue a little greenery to the center section as well.
6. Finally, fill your candy wagon with an assortment of nuts and candy.
Tip:
As I make a craft, I often think of other ways that it might be done - so next time I try this project, I might put a Santa or snowman at the front, with a steering wheel made of black fun foam in his hands. Also I might put bows on the sides and the back of the wagon.
I'm sure that you can think of other ways to make your own version of this Christmas Candy Wagon Craft. Enjoy!
